Rose Hair Clips

I love felt, and felting Goodwill wool sweaters, and sewing with felt, and crafting with felt. I love  all things felt! I found some little hair clips at the $ store (6 for a $). I have been wanting to make some of these adorable rolled felt roses. Plus Stampin Up has these new amazing large Pearl Jewels and wanted to craft with those too. So this is what I came up with. Like them... well I love them and so did my girls. Read on to learn how to put these cute rose hair clips together.

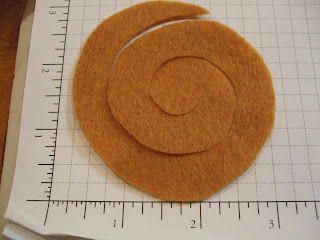
 Cut the felt in a circle and then spiral cut the circle like this shot. I started with a 3x3 square and just trimmed it down. You can make these any size to fit your project needs. Make larger ones for wreaths and smaller one for cards.
 Starting at the outside of the circle roll up the felt tight.
 Till you get this. Cuteness huh! The last little bit at the end of the inside of the circle will just lay on the bottom of the rose. Its like magic - well sorta - well not really - but it is so nice to see it all fit like it was made to!
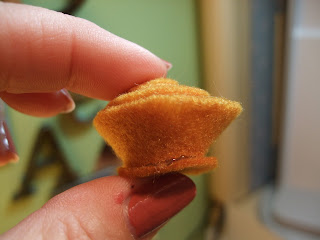
 I hot glued the bottom edges of the roll rose to the flat little center of the circle and made a nifty little bottom to the rose.
 See, isn't this just awesome. The below shot is a shot of the bottom.
 Cut out leaves from green felt and glue to hair clip, glue on flower to top of leaf.
 Now here comes the Amazing pearls. they have sticky on them already, however being I was using this on my favorite felt (told ya already how much I love felt, right) I hot glued a pit in the center of the rose and added the pearl.
 Just look at this bouquet of great felt rose clips. Want some, and not time to make them, or not really crafty? I can make them for you in any color for just $3 each. Contact me to place your order.
 Now to these AMAZING large Pearls. You can fine them here on my website. The pearls are listed on page 8 on the site. They are also shown in the mini catalog on page 2,. #125577 Lg Pearl Basic Jewels $4.95 for 40 pearls. Great price, great product. LOVE THEM - ya got to get some.
Hope you enjoy and make some great little felt roses for yourself. Happy Crafting!

Coffee Cup

Come to Project club this month and make this adorable coffee mug. Thursday March 8 at 6pm at The Stamp Pad.

Cake Pops

Well I bit the bullet and jump on the band wagon of Cake pop bakers. I ordered me one of these little babies.
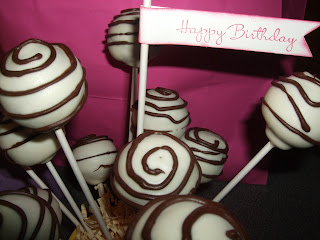
 Oh am I excited to use this. I must say I am happy with the results. My non-sweet eater hubby loved the pops. Emily was surprised with this mug full for her 20th Birthday.
I am not crazy about the true cake pops that are filled with frosting and cake, then dipped. These are little balls of cake with no filling and then dipped in chocolate. Oh yum. Emily loves dark chocolate  - so I made her dark chocolate cake dipped in white chocolate and swirled with dark chocolate. Pretty amazing. So if you are in need a a unique gift of eats, make some or better yet order some from me!

Graduation Announcment Ideas

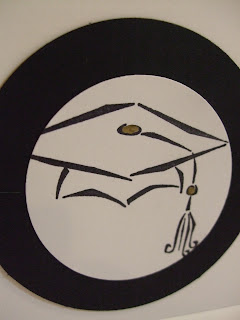
Do you have a graduate this year? Are you thinking that saving some money on the invites/announcement would be nice? Well maybe these few samples will get your creative juices going. The following card is using a past graduation stamp set from Stampin Up, but I have love it for years. There are many available on the market that would fill your liking. OR you could come to Friends Friday and use my set for free! How's that for customer service! See the calendar of events at top of blog.


 The top card and the one below with circle element can hold a vellum liner printed with the graduates announcement info.

 This next card with the ribbon is a one sided card. Print the vellum with grad announcement and layer it on with the ribbon. The stamped hat and roll with show through the vellum.
If you don't have the time to make your own, I can make them for you. Email me for pricing. Happy Graduation planning and enjoy the moment. Remember I make cakes too - see "Sweets" above for samples.

Cinnamon Honey Butter

This yummy bowl of goodness is so - well I let you fill in the blank once you make yourself a bowl full. I made this to go on croissants for our Valentine Lunch. I don't remember who posted or where this originally came from - but thank you to the wonderful person for sharing.

 I love Texas Road House - maybe cuz I was born in Texas or cuz the food is good, or cuz I just really like the dinner rolls and the brown buttery cinnamony goodness that is served with those yummy rolls. So if you like that heavenly lick it off your fingers yummy melted goodness- here is the recipe! I know you love me about right now, right?

In a bowl beat together the following:

1 C of the real deal butter, softened at room temp.
1 C Powder Sugar
1 C Honey
2 Teaspoons Cinnamon (personally next time I make this I will be adding more cinnamon - cuz it makes everything taste better)

Whip till smooth and somewhat fluffy. Pour into a serving bowl, refrigerate a bit to set, then use on the special dinner table. Or pour into a bowl with a good sealing cover and refrigerate till ready to use. If ya let it sit till hard, then you could scoop with a fancy butter scooper thingy and make fancy butter curls. (How ya like my description of cooking tools, hence the lack of professional cooking school). But, if the curls get to warm they may loose their shape. So serve the curls cold.  Enjoy!

Coffee Tea or Mug of Yum?

How cute is this? Want to learn how to make it? Come to Project Club on Thursday March 8th at The Stamp Pad at 6pm. Class is $10. Printed instructions, all supplies needed for project are included. Please RSVP - ASAP by emailing me.

 I made these for the special men in my life - hubby and father in law. My dad is in Ohio now, or he would have been added to that special list of mug gift too.
Super duper cuteness!

Scissor Pocket


Another little gift out of the felted wool gift from Janice Rowe. I cut the black pocket out and then added a little piece of felted wool to the tip to keep the scissor point from poking through. Little scraps of vintage lace. I backed the pocket with gray felted wool for stability. The ribbon has a bit of velcro on it and the other piece of velcro is placed in the center of the finger hole on the pocket. This will keep them from falling out when not in use. (I hope) Since this is the first one and I didn't use a pattern - I am pretty proud of it - yet another gift I love so much would like to keep it for myself! I hand sewed everything, and it took just a few hours to complete. You want one too? Well I can fill special orders. $15 (+ shipping) Just email me for your order. (scissors not included)

Wool Felt Pin Cushion

I love sewing with felted wool. My sweet friend Janice Rowe purchased some Goodwill Wool Sweaters and she cut them apart. Then we washed them in a pillow case and ironed them while wet. Janice said, "...there is your stack, now make something with it!" Gotta love that! So I did. I make this adorable pin cushion. It is filled with play sand (I have never heard of that either, but love the outcome). It is doubled lined and I added a layer of batting under the top. I just love it (would keep for myself if I hadn't thought and prayed for the person while making it) - and I am hoping the lucky recipient will love as much too.

Headbands

I made a few headbands and am so happy with the way they turned out. Fun little project that turned into making about a dozen or so. I shared with the beautiful girls in the family and now have a few left. They are for sale for just $5 each (+ shipping). You want one, two or all - email me for payment arrangements.

Happy Valentine's to me

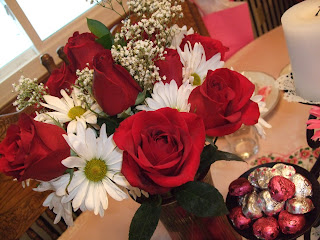
My sweets gave me flowers - ah. It is really a big deal, I love love love flowers and he has given them only four times in our 22 years of marriage. I figured out the trick... note to self: send sweetie to store on Valentine's day for salad fixings! He will being home flowers! Perfect plan that I didn't even plan. 

 This yummy little sweet is dessert for our family Valentine's lunch I have planned today. What could be better then a raspberry filled cupcake, oh and ya salad and Quiche Lorianne. Oh why lunch, because sweetie works nights.
What is your plans for this day of love? I hope yours is filled with joy and love.

Christmas Valentine Candy

What a great use of Christmas Candy! I have seen this in the past and wanted to try it forever. So took the time to make up these with the left over candy canes from Christmas. Who'da thunk it!

Oven at 300 degrees. Lay parchment paper on cookie tray. Be sure it is flat, or your melted candy will be curled up. Lay out your candy canes in a heart shape with points and centers touching. Be sure to leave enough room for the lollipop sticks.


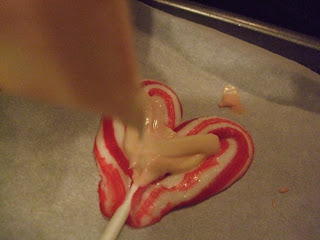
Put in oven for a short 5 minutes. Be sure the canes do not melt to much. Remove from oven and place lollipop sticks right in the bottom point of the melted heart shape. Work quickly and carefully as the candy is hot. Pinch the melted candy cane to the stick.

  
Melt some candy melts in color of your choice. I had white and pink (fitting huh?) To melt: put a few candies in a zip lock bag and zap for 30 seconds at a time, smooch around in bag to mix, melt and move to one bottom corner of baggie. Snip the tip of the bag and squeeze the melted yummy in the center of the heart. I smoothed and spread it out a bit with a tip of a knife.


Why of course add some cute sprinkles. Cuz just looking at them make everyone happy right?

 Wrap in clear cello bags found in a gazillion places on the net - BUT Stampin Up carries the best. Tie a ribbon on and here ya go Christmas Valentine Candy for all. Now if that doesn't say I love you... 


Pretty stinkin' cute huh!  Oh and ya - white chocolate mint - yumm!

Valentine Be Mine

The gorgeous card is a gift to me from a dear lady and friend, Judi Birt. How special I felt upon receiving this. It is just beautiful. The best complement to any card maker crafter is when you receive a card with elements or techniques that you shared. Thanks Judi I just love it, and love you.

Root Beer Float Cup Cakes


Special order for the birthday boy Colby. The only thing missing is the root beer barrel that will be placed on the cake just before serving. Notice the cute bunting on the "special cake" for the Birthday Boy. I looped the cream cheese frosting so it would look more like float fizz, and cut the straws shorter. Easy as pie root beer float. White cake(Colby's fav) and cream cheese frosting (mom's fav) to fill the order. But how much fun it would be to make root beer float cake! 

New Events added to the Calendar


Mark your Calendar!

Artist Trading Card Class
March 10 at 2pm 
Make 10 different ATC cards for $15.
Class free with $40 Stampin Up order.
Includes snacks and door prizes.


Stamp-A-Stack of Masculine Cards 
April 14 at 2pm
$20 includes 10 cards.
Class free with $50 Stampin Up order. 
Includes snacks and door prizes.

Check out the complete calendar of events at the top of my blog under "Class Events & Fun"
Please not this card will not be make at the upcoming Masculine Card Class as it was already shared in January at Card club. Inspiration came right out of the Sale-A-Bration mini Catalog. I just "manned" it up some. 

Remember Sale-A-Bration is a great time to stock up on card stocks, buttons, ribbons because with every $50 order (before s/h & tax) you get a FREE gift from the Sale-A-Bration mini Catalog! Oh Ya - "If its FREE, it's me!" As my sweet Aunt Olga would say.

Recipe Club

What is Recipe Club all about? Well here are a couple of recipe scrapbook pages that were done over the past year. You get a double 6x6 layout, the recipe, and the protector. Plus you get to taste test the recipe/s, enter in the door prize drawing too.

So you think you might enjoy making, tasting, collecting and making it again at home? Join us for a fun night of food, fun, and friends!

Looking for Something to Do?

Join me for a Club. You can come or get Club in the Mail. Check out the page at the top of my blog: Click on "The Stamp Pad Events" and see the complete calendar for the year. Here are some samples of the projects that were shared.
Recipe Club


Card Club

Project Club

Chocolate Dipped Strawberry Box


So cute you just want to eat it! We will be making this tonight at Project club. Seats are open. Class is $10. Get this FREE (and the instructions) for booking a Stampin Up Workshop by March 15.

Wrapped Clothes Line Tutorial

 Here is the long awaited instructions to make the wrapped clothes line coasters, baskets and more. Well I am going to start with the coaster anyway.


You will need1"  strips of fabric cut from selvage end to selvage end. Work with just one strip at a time. You will sew the strips together one at a time and only when you get to the end of each strip. 

Lay the clothes line end at an angle on a 1" wrong side strip of fabric. See photo below.
Wrap the end around the clothes line end just to cover the end. It dose not need to be perfect as if there is a bit of fabric nub at the end, this will fill in the center of coil. So don't fret over perfection on this. 
 

  Wrap the all of the first fabric strip and pin at the end to hold in place. Sew a straight stitch from the beginning of the clothes line down about 6"-7". This will hold the beginning wrappings in place and make it easier to work with in the beginning.

Coil the beginning of the fabric wrapped clothes line till you have 4-6 coil wrap, hang on to it with all available fingers as it will unroll faster then you can blink.

Once you have it all together and in place the way you want it, sew a straight sticth "X" across the center of all the coils. This will help you to hold it all in place before you begin zig-zaging the rows together. Also this will save you from sewing your fingers to your project! As you can see it is very small at this point and your fingers are up close and personal with the needle.
 

Beginning at the center of the coil, zig-zag, set your machine on the widest zig-zag stitch in the center of where the coil rows meets. See picture below. Your pressure foot should be in the center of the coil rows and your needle will catch each side of the row, attaching the  rows together. TIP: Use the shade of thread that matches the most alike colors in your fabric swatches. Have lots of thread available as this will use lots of thread, well depending on the size of project you make.

 Here is a close up of where you pressure foot should be. You just sew in circles from here on out. At least you are not skating in circles and making yourself dizzy... but by the time you get to the end of this crazy tutorial you may be dizzy anyway!

 Coil till you get to the end of fabric then sew on the next strip. Just lay the fabric strip on top of the end overlapping, no need to make a pretty seam (you don't want the bulk of a seam any way) Don't worry about hiding the ends, remember you cut from selvage to selvage. However if you are using scraps and the ends are not the salvage ends.... just sew it as you would if it was. No worry about fraying - it is gonna fray anyway. Rap the fabric strip around the clothes line and pin it at the end to hold in place. Coil and zig-zag around till you meet the end of your fabric strip.  Add another strip of fabric, wrap, coil, sew, add another strip, wrap, coil, sew and so on and so forth till you have it the size you want it.

To finish off: cut the clothes line about 1" - 1 1/2" shorter then the end of the fabric. 


Rap the fabric around to the end of line and continue turning fabric around on its self till you are at the end.

Zig-zag the rows together till you have run out of rows, then make one last row around securing all loose ends on the other row. I also find that this helps the last row from fraying.  To make a coaster sew about 7-9 rows from center. It is up to you how big you want or need it. For pot holders/hot pads you would just add more strips of fabric to make more rows.
I hope you can understand this- but remember if you need help just leave a comment so everyone can learn from the comments and questions. I will continue with this tutorial in the near futrue to show you how to make a basket. But this will get you started. Enjoy and happy wrapping!