Birthday Gift

 A sweet friend is celebrating her birthday this week, and I thought I would bake and fill some cupcakes for her. Raspberry Lemonade, Bavarian Cream Chocolate and Vanilla with butter cream frosting. I know I should have taken the picture after wrapping them, but when I went to take the wrapping off it was becoming a mess, and thought - well snap the shot and leave them be.
 I glued the candle stick to the cute red plate using E6000 glue. Let set over night, and you have instant cake plate. She will (I hope) love it, as she entertains many in her home. So this will come in use a lot.
Made the cute little cup cake flags too! And you know it was with all Stampin Up products. Pennant Punch and background papers.  Nothing screams" love you" as a homemade, home baked gift.
Happy Day!

Happy Birthday Smokey

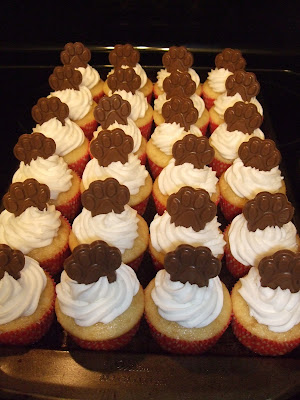
I baked a few (just 112) Cupcakes to celebrate Smokey's Birthday at Lieber State Rec Area in Cloverdale Indiana this past Saturday. Chocolate, Vanilla and Lemon cake all with Buttercream frosting. Topped with a Smokey the Bear Paw Print Chocolate.


 The paw chocolate candy is so stink'in cute. Yep I made that too.
Happy 68th Birthday Smokey the Bear.

Yummm bread

 I have done a bit of baking this week to say the least!. This began as banana screaming "bake me, bake me". So I did. I have the best zucchini bread recipe and thought to myself, self, wonder if I could use these 5 bananas instead of zucchini? Well then I thought again, wonder if I could blow Starbucks out of the water and make way better banana chocolate chip bread? Well oh my goodness, oh my goodness - this is so good. I cannot stay out of it. The batch made 6 little loaves. Three I wrapped up for camp counselor thank you gifts from Candace.

 Wrapping little loaves of bread is easy peasy. Just cut a 12x12 designer series paper, or what ever scrapbook paper you have on hand and trip one end off about an inch or so. Tape the paper around the bread. I stamped "homemade...." and flipped the little extra piece of paper over and stamped Thank You and glued all the little tags to the top of the loaf.
 Oh yummy goodness. It is like eating Lays potato chips, ya just can't stop at one piece. Oh you would like me to share my recipe.... well, Ok! But only because I love you so much.
Moms Zucchini Bread
I mix all by hand in a large bowl. 
Beat with a fork:
3 eggs, 1 C brown sugar, 1 c white sugar, 1 c. veg. oil.
Stir in:
1 tsp. vanilla, 1-1 1/2 tea. cinnamon, 1/2 tsp. ginger, 1/2 tsp. salt.
Then stir in:
2-3 c. grated zucchini or bananas.
1 tsp. baking soda, 1 tsp. baking powder, 3 c. flour

Optional stir in:
1 c. chopped nuts (I usually use walnuts or pecans), 1 c. raisins (I never add these family thinks they are ucky baked) 1-2 c. chocolate chips. I had two opened bags, and used some of the reg. size and some of the mini size.
Bake in 2 greased and floured loaf pans at 350 degrees for 45 minutes to 1 hour. When baking in the mini pans do adjust the length of baking time.

My special secret tip: (boy are you lucky to score this one from me)
I do not flour my loaf pans with flour. I use a cinnamon and sugar mix. After spraying the pay, I sprinkle the cinnamon and sugar mix on and cover bottom and all sides really well. Pour in the batter, bake, and then once done, let sit for only 8-10 minutes to cool then pop out of pan. If you let it sit to long the sugar will make the bread become one in the pan, and you will be eating it with a spoon out of the pan. I have done this little trick for years now, and the family loves fights over the crunchy edges! I never liked the flour layer on the outside of my breads and bundt cakes, always thought it made it super dry.

I will use this for my banana bread from now on, and if that is the case, sometimes I will stir in a big ol' tablespoon or so of peanut butter. Oh ya - peanut butter, lets just say YUMM! Banana, peanut butter, chocolate chips and cinnamon - all the things I love rolled into one bite. Whooo!
HAPPY BAKING!


Card Packet Folder

Would you like to learn how to make these adorable card packet folders? Super easy, quick and they make really great gifts. All you need is a few (I put in 6) assorted greeting cards and one 12x12 double sided designer series paper or card stock.
 Using the simply scored scoring tool with the diagonal plate in place. Lay the 12 x12 designer series paper in the corner.
 Score from the upper left corner 1/4" to the right of the center of the corner all the way to the lower corner.

 Then score 1/4" to the left of the center corner all the way to the lower corner.
 Now turn your paper or card stock 90 degrees to the right and put the non scored corner of the paper in the corner of the simply scored tool. Measure 4" to the right and score all the way to the other edge of the paper. Next measure 4" to the left and score all the way to the lower edge as well.
 Next fold along both of the 4" score marks. Creasing well. I flipped my paper over so the swirly design would be on the outside of the finished packet.
 Here is a shot of both of the 4" scored lines folded in towards each other. Oh, no glue is needed.
 Flip the paper over so it looks like this. The folds are on the back side.
 Fold up one of the 1/4" score lines and crease well. Then fold along the other 1/4" score line. You will be creating somewhat of a gusset.
 Your folded paper or card stock should look like the side view shot below.

 Next line up the top edges and punch two holes in it side by side. This is so ribbon will thread through.

 Tie your ribbon in a bow, and for those who can not tie a nice bow, DON'T! Just tie your ribbon ends in a knot!
 Back view of the tied bow... or for some knotted ribbon!
 And there you have it, super duper stink'in cute card packet folder. You could also put in tea, hot coco packets, candy bar, a letter, notes, postage stamps, a pen, photos, coupons, gift cards, money, little gift book.... oh the possibilities!

 I finished mine up with a punched flower and a few circle punches to form the flower center and a tag. You can add leaves, buttons, embellishments.... on just let your creativity flow.

 Sample of the greeting cards added to the inside. I put 3 greeting cards in each pocket. Giving a gift of six in each.
 Want one? Host a workshop and one is yours for FREE while supplies last. These little beauties are Hostess gifts, so for the next 8 clubs or workshops Hostess' one of these will be yours.
You can click on any of the above highlighted items and it will take you to a great place to order those items! Shop a little while there. You get a free stamp set gift for any $50 order till the end of the month.
 HAPPY GIFT GIVING!

Desk Before & After

 Emily needed a new desk in her apartment. Well have ya ever just asked for something ya need from your friends or family? I was reading a blog post about saving money and it was explained that before you go out an buy, ask your loop of contacts for the things you need, you just might score some really great stuff for free. Someone's trash is another's treasure. Like this great old unneeded desk. Thank you to my dear friend Pam Wright for giving this treasure to Emily. It is solid wood. The perfect size for study and crafting/sewing.  One of the drawers was stick shut. So after about 1/2 hour and a yard stick we got the coloring book to turn loose of its grip and was able to get the drawers open.  "It has great bones", well that is what I hear designers say when they find great stuff! Grandpa glued a drawer back together. Dad nailed the trim back in place and reattached the back panel. Emily took off the knobs, sanded the desk and.....
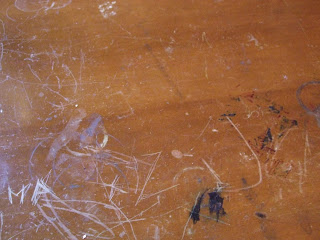
 Here is a shot of the top. Ya it was very well loved. But after sanding it.....
... put on a fresh new (few) coats of paint. Here is the trash turned to treasure.

 The top never knew what had been done to it in the past.
Perfect! Emily has a chair that matches and wants to strip and stain, and make a chair seat cushion too! Hope this inspires you to seek others trash and turn it into your own treasure.
HAPPY BEFORE AND AFTER PROJECT!

Fishy Kisses

I made this fish card for my hubby who loves to fish. I free hand the fish card shape, and yip it opens up. The fold is at the tail. I did add red lips! He gave a chuckle upon opening it.  I used oval punches for the scales and fins and circle punches for the eyes. I cut one circle in half for the eye lid. The lashes are a strip of card stock, cut on long strips and then curled a little.   Bobby loves to fish, so there couldn't have been a better card to give.

Nature Walk Tag Envelope Tut.

Well as promised here is the tut for the Tag Pocket. These tags can be used as tags for packages, book markers and even an addition to front of the card. I will show you how so read on my stamping friends. The pocket envelopes were a gift from Barb B. I have made a few fun items with them and shared in card clubs too, but wanted to try another. I love this stamp set, so easy to use. There are lots of images to help you with creating some great things. 
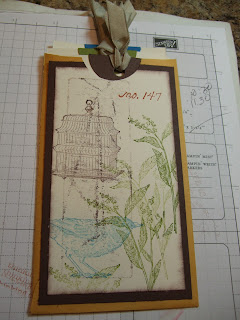
You can use any side pocket envelope, even make your own. I measured mine and cut the vanilla card stock about 1/2" smaller. I inked a clear block with chocolate chip ink and stamp it to the left side of the card stock.


Then I stamped the florals in old olive ink, bird in marina mist ink, and the bird cage in chocolate chip ink. I then sponged the edge of the card stock.

Cut off the envelope flap and toss it. glue the stamped vanilla card to a piece of chocolate chip card stock about 1/4" larger on all four sides.

Punch out a little half circle using a circle punch from the envelope.

Glue the stamp layers to the center front of the envelope. Then punch the half circle out of the stamped layer to match with the piece already punched from envelope.

Now lets make some tags. Cut vanilla card stock out that will be the right size to fit your pocket envelope. Stamp on each of them using coordinating ink colors. Punch a circle out of coordinating card stock, fold the circles in half and glue over the top edge. Punch a hold in the center of the folded circle and then add a ribbon tie. Easy right!


Now to make a card out of a tag. Fold a 8 1/2" x 5 1/2" marina mist card stock in half to form a card. Tear the lower edge of the tag off (see below picture). Fold down the ribbon so it will not stick above the card and not go in the envelope. Use a few glue does to keep ribbon in place. Glue tag to card front.


Stamp the envelope too. Hey come to Scrapbook club to see the 12x12 scrap page made with this really awesome stamp set. I have already used this card shown for my dear friend Norm G. that recently had heart surgery.
Nature Walk Stamp Set (w) 121925 #26.95 (c) #121997 $18.95
 Enjoy Your Day!


Beach Wedding Cupcakes & Cheese Cake

Cheese Cake, Raspberry Lemonade Cupcakes, and Chocolate Bavarian Cream Cupcakes

Lit from beneath five glorious tiers holding over 100 amazing filled Cupcakes.

Cakes topped with butter cream frosting, sprinkled crushed graham crackers and chocolate shells and starfish.

Cheese Cake with Raspberry sauce on the side.

Just a close up of that yummy dish of oh my goodness Cheese cake!

And the Bride and Groom hoping the other makes the bite in the mouth and not on the face! Congrats and many happy years of love to Shelly and Josh.
 Eat Cake!