Happy Easter

Thanks Georgeanne C., Rose W., Janice R. and Pam W. for particiapating in the March Easter ATC Swap. Join us in April for the Spring Theme ATC Swap. make four 2 1/2"x 3 1/2" ATC's and have your swaps to me by the end of April.
You you enjoy the season of the Risen King. Blessing to you all.
Happy Easter

My Paper Pumpkin Arrived


Look what arrived in the mail a few days ago. My Paper Pumpkin Box. I really wanted to tear into it... but ran and got the camera so I could share the excitement with you too.
   I lifted the lid to find this pretty wrapped gift and welcome card.
 I squealed, giggled, and clapped with glee when I found all this packed inside. I am so nerdy... what would it have been like if there was a pile of cash in that box.... probably would have passed out!  There was a free clear block for me to use on the next upcoming stamping paper pumpkin projects. And... a mini stamp pad, two super cute stamps, amazing card stock already cut and scored to make the folding easy, background papers for four cards and envelops, buttons, lovely card stock repositional stickers and....
... full color easy to follow instructions, in English, French, and Spanish if you need.

 
 Put the stickers on the stamps and.....
 ... cling the stamps to the clear block and......
... create some really wonderful works of quick and easy art.
 You know me, I just couldn't make them all the same like the directions said. And I wanted you to see some different layout designs as well. I think this helps to get those creative juices going.
 I had to switch them up a bit. Within as little as 15 minutes I had four great greeting cards ready to sign, seal and deliver. These are great for doing that old fashion hand written note thing.... remember that far back? I  plan to use a few for birthdays too.
Here they all are, with stamped envelops too. I hope you hop on over to www.mypaperpumpkin.com (click on the colored underline link to get there the easy way) and sign up for your very own kit. Please be sure to find me as your demonstrator. If you sign up by the 10th of each month you will receive your special box in the mail around the 15th or so. You can stop receiving the kit at anytime, ( I hope you never stop it) you can get a few extra kits and use them as gifts.
Hurry, don't miss out on the best talk of the town. 
My Paper Pumpkin makes me Happy!

New Baby


The newlyweds have a new baby! The look a little shell shocked don't ca' think?
 
 Meet Barley. He is 9 weeks old and is a Beaglier. He is half Beagle and half Spaniel.
This is when he is a good boy! haha! Since our grandchildren live so far away, it is nice to have a grand puppy close by! He is such a sweet little cuddle bug.
Puppies are so cute!

Turtle Cheesecake

I baked this in my large round mold from Demarle, and below you can see that it has been slipped out of the pan with ease. Set upon my beautiful Candlewick antique plate - it is a sight to behold! 
 I don't usually make any other cheese cake recipe except for my time tested proved to be the best ever cheesecake known to mankind... but I tried out this new Turtle Cheesecake. It is all that and a bag of chocolate chips.... BUT, and that's a big BUT.... the middle fell in. It still was drooled over, and lapped up .. but I think I rewrite it to fit the perfect recipe the next time I make it.

 I made this for Emily's 21st birthday dinner celebration. She didn't like the "magic" candle (heeheehee)... but loved the cheesecake!
Turtle Cheesecake
Crust: 1 9oz pkg chocolate wafer cookies (chocolate graham crackers or chocolate animal crackers) I used the animal crackers).
6 T unsalted butter, melted. (I needed a bit more as the crust was dry and wouldn't stay together.
Preheat oven 350 degrees (340 for Demarle mold)
Finely grind cookies in processor, blend in butter. Press crumbs into bottom and 1" or so up sides of 9" spring form pan.

Filling 4 8 oz pkg cream cheese, room temp. (I forget to pull this out, so took it out of the wrappers and zapped them a bit to soften it)
1 1/4 c sugar
5 large eggs
1 1/2 tea. vanilla
Beat Cream cheese in large bowl until fluffy. Gradually add sugar and beat until smooth. Beat in eggs 1 at a time. Mix in vanilla.

3 T whipping cream
4 oz semisweet chocolate chips
Bring cream to a boil in sauce pan. Reduce heat to low, add chocolate chips and stir stir stir until melted and smooth. Remove from heat.

Pour cream cheese mixture into crust. Spoon chocolate mixture over by tablespoons, spacing evenly. Using tip of knife, swirl chocolate into filling. Add a bit of cheese mixture to chocolate if too thick.Bake for 1 hr and 5 minutes. Mine too about 8 minutes longer. Cake will crack. Cool in pan on rack. Chill overnight. (I baked early in day, once cooled in oven, I moved it to refrigerator till after dinner, topped and served) This may have been why it fell in the center to much. But since I wasn't entering it in to some contest or cooking show.... my family was happy to have it to eat anyway, no matter how it looked.

Topping
1 c caramel sauce (ice cream topping works great)
1/2 c chopped toasted pecans (I didn't chop mine)
Chocolate Ganache (melt 4 oz chocolate chips with 2-3 T heavy cream) I didn't do this.

Drizzle caramel and chocolate ganache over top of cake. Garnish with pecans.

If you are enjoying the blog posts from time to time, I would love to hear about it. Let me know if you make this!
Enjoy!


Blooming Daffodils

I think this will be one of the Cards shared at Card Club in March. Ohhh, sneak peek! I am also going to show you how to make the daffodil punch.

 You will need the new 7/8" scallop punch from the mini catalog # 129404 $14.95
1 3/4" scallop circle punch #119854 $16.95 (mine shown is the old style)
More Mustard Ink #126964 $5.95
Daffodil card stock - how fitting huh!?! #119683 $6.95
Click on the highlighted and underlined price to order.
Punch out:
one 1 3/4" scallop circle
one 7/8"  scallop circles
and from the corner of the paper scrap or punch out 2 more 1 3/4" scallop circles. Cut these down as show in picture. Sponge around all the edges with more mustard ink. Pop dot it all together as shown in sample. I hand cut out the leaf and stem.  You could stamp them.. I am sure I had leaves and stems, but to lazy to get up and look for them when I had scrap background paper right next to me.
Spring's a Blooming!

Time ATC

Here is another ATC swap themed, Time. I used the "Dapper Dad" stamp set from the new not so mini-mini catalog, like at the left if ya want to see more great stuff in that mini. I made the paper and had a stack of it screaming to be used. I picked up this clock embossing folder along the way in my shopping and thought it perfect go with a few watches, time pieces stamps that I have. I used some old product that Stampin Up used to carry on it. Pearl-x powder, the little letter stamp set.  Think it says it all... we never have enough time to do all we want to do.... well for me it is to stamp, cook and sew all I want to stamp, cook and sew!
Find Time to Stamp!

Banana Cinnamon Rolls

My oh my are these amazing! Banana Cinnamon rolls - have ya ever heard ov' such a thing? Hope you indulge and make some too.
I had some banana that were screaming" bake me, bake me!" So I baked them! I first made these "good for you cookies"... well no one liked them. They sounded good, but the texture was like fruit cake - yuck! So I moved on to something that is not so good for you. These lovely muffins.
I baked these in my Demarle muffin mold. You can use paper liners if you want... but you sure don't have to. I have made notes in the recipe below of what to do if using your Demarle molds.
Look at how clean they came out of the pan. Just push up from the bottom a bit and out comes that little beauty. Super duper great! The more I use these molds and trays the more I love them.

Banana Cinnamon Rolls
Muffin Batter:
2 eggs
1/4 c oil
3/4 c sugar
1 c mashed banas (about 3)
1 c flour
2 T cornstarch
1 1/2 tsp. cinnamon (I always add more) Love cinnamon
1 /4 tsp nutmeg
1 1/2 tsp. baking powder
1/2 tsp baking soda
1/4 tsp salt

Cinnamon sugar topping swirl:
2 T unsalted butter, melted
1/4 c brown sugar packed
1 T cinnamon
1 4 tsp. nutmeg

Cream Cheese Icing (I don't care for this, but my family did)
2 oz cream cheese softened
1/2 c powdered sugar
1 tsp vanilla extract (use clear vanilla for white frosting, as the brown will discolor the frosting)
1/2 - 1 T milk, plus more if needed

Preheat oven to 350 (340 for Demarle molds) degrees. Grease and or line muffing tin; (or do nothing to your Demarle fold); set aside. Whisk together eggs, oil, sugar and bananas till well blended. In a separate bowl, combine the flour, cornstarch, cinnamon, nutmeg, baking powder, baking soda and salt. Add dry ingredients to the wet ingredients and mix until just combined. Divide batter evenly between 12 muffin cups, filling about 2/3 full. Combine the topping ingredients and divide between the muffin cups. use a toothpick and swirl slightly. Bake for 22-24 (24 if using Demarle) minutes or until the top springs back when lightly touched. Allow to cool for a few minutes (10 minutes if using Demarle)  and carefully remove from pan. Cool completely and drizzle with cream cheese icing. Refrigerate any leftovers muffins.
Bake some Muffins!

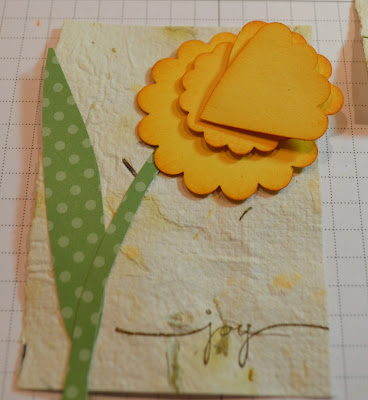
Daffodil ATC

 I made this to participate in an ATC daffodil swap. Instructions on how to will come, so stay tuned!


Happy Spring!

Try me kit by Paper Pumpkin

Try Me—You'll Like Me

Available in March
  • Afraid of commitment? Too much pun'kin for you to handle? You can try me and I'll visit just once. (But I know you'll want me to come back every month.)
  • • I'm $16.95 (plus shipping).
  • • I've got all the stamps, ink, paper, and accessories to create beautiful projects.
  • • I'm all cut, measured, and ready—with instructions included. (Don't worry, I'm easy.)
Click on the color words: Click here to sign up. Be sure to choose me as your demonstrator to get a little gift in the mail from me.

Snap Pouches

I love these super cute snap pouches. My dear friend Janice Rowe shared this pattern with me. I whipped up a few of these the other day. Super quick and it takes a metal measuring tape in the casing at the top to get the "snap" closure. I plan to use the brown one as my swap card carrier. There is about 25 cards in there ready for swapping. It is the perfect size.
 My third quilting project and I learned how to make a prairie Point Tabs. I am happy with the outcome, and even more happy that I used some of my ever loved fat quarter stash. I am out of Stampin Up fabric right now since I used it all for the tissue holders!
This is the inside. The lining is cut a little longer and folded to the outside to become the casing. I am unable to share the pattern as it is copyrighted, but you may find it at Stitchin' Sisters. stitchinsis@aol.com.  If you are not interested in making your own, and want one. I will be happy to make one for you. The two lavender colored ones are available for $8 each. Contact me for more details.

Dinner Time- meat loaf

I tested out my Demarle round mold to make a meat loaf and it was super yummy. My daughter said it was the best I ever made. I am sure the new pan had something to do with it, as it is the same recipe I use every time!

This picture is gross, thawed meat and it looks like it is in yellow milk! Well it is dear burger (that we process ourselves) a partial package of bulk sausage. I made homemade pizzas the night before, and what was left of the sausage I added to the loaf. I usually use sausage in the loaf anyway. Lots of seasonings, and the yellow milk is a package of brown gravy mix. I don't care for the tomato type topping on meat loaf, I have always used brown gravy instead. I put the octagon silpat mat over the round mold and baked it for an hour and about 10-15 minutes at 375 degrees.
I almost didn't get a picture of it in the pan before we ate it. No baked on sticky hard as a rock to get off goop on the sides of this pan! Woo hoo easy clean up. I love my Demarle pans.
Dinner is served! Yes the brown gravy is then spooned on the meat and the potatoes. I used a new recipe for the potatoes too. Added sour cream, butter, parsley, salt and a bit of garlic. Oh my yummy-fied! What are you cooking tonight? Reservations! Yes, I would prefer that too... but we cannot eat out every night.
Happy Cooking!

Feb Card Club

 I have two card club packets left from Feb card club. If you are interested in these, please contact me right away as they go super fast. Cost is $10, plus $2.50 for shipping.


 Sorry about the view of these last two... I have tried and tried to get them to view right and they keep popping back to this! I give up. You get the idea anyway.. right???? I hope! Ug!
Happy Card Crafting!

Tissue Holders

I have made about 50 of these little beauties using Stampin Up's beautiful fabric. They are birthday gifts for all my club gals... oops their goes the surprise! Well I have been asked to share the recipe on how to make these. Well here ya go....
You will need to cut five pieces of fabric from scraps or fat quarters. It is best to iron your fabric before cutting so you get a better measurement.
Cut two pieces of fabric at 4"x4" and three pieces of fabric 4"x5 3/4".
Fold the two 4"x4" pieces in half and iron.
Fold two of the 4"x5 3/4" pieces in half lengthwise and iron. 
The third 4"x5 3/4" piece will be used for the back of the tissue holder. 

Lay the flat 4" x 5 3/5" piece face up on the table in front of you. Then lay one of the folded 4"x5 3/4" with the fold to the center, and the cut edges to the outside.

 Lay one of the 4"x4" folded pieces with the folder edge to the center, and the cut edges to the outside, lay it over the last layer as shown in above picture.


Lay the seconded 4"x4" piece under the first layer, matching cut edges, and folder edge to the center.
Using the last 4"x5 3/4" piece, layer one end under and one end over the 4"x4" pieces. Be sure the folded edge is to the center and the cut edge is to the outside. Pin everything in place.
Sew all around the outside edge about 1/4". I used a surger stitch, but a straight stitch and a zig-zag will work too.
Turn the holder right side out, and press it. The corners will not be sharp, but it is not needed for the holder. Slip in a mini tissue package.
Here is a box of some that I have done. I wrapped them in a med cello bag and taped them closed to keep them clean till they are given away. Super quick and fun. Great gifts. These would be great for those who need a hug, a get well, even a tear dried.  If you need help with this project, you can leave me a comment below, and I will get back to you ASAP.

I have made and plan to make a few more sets of coasters using this same pattern. The fabric cutting guide is five pieces of 5"x5" square, fold four in half, layer, sew and turn the same as above.

Increase the square size to make pot holders, just add a layer or two of quilt batting to absorb the heat. Hope you are inspired to create using our great fabric too.
Happy Stampin Up Fabric!

Filter Flower how-to

Well as promised, here is the how to on the Filter Flower makings. Once you read through this you will be amazed how easy they are. I used the ever so great Creped Filter Paper # 129393 $2.95 from the not so mini, mini catalog. (link at the left)
Since I used all of  the circle papers for the flower on the box, I used the rectangle ones that are included in the package. Using all of them folded in half and cutting through all 8 layers using the largest Floral Frames Framelits # 127012 $26.95.
 Then you can move (twist) them so they are not lined up exactly and staple the center in a "x".
 The separate the top layer of filter and pinch just above the staple. Move to the next layer and do the same, but pinch them a bit differently so they do not all lay and pucker at the same place. This will give you a fuller flower.
 Once they are all pinched you are done. You can see that I have a bit of color at the tips of the flower petals. Using a drop of two of refill ink in a tiny bit of water and a paint brush, you can brush color on the tips. Start with a little, then add a few more drops of ink refill and add a bit more color. Remember you can always add more color to anything, but you can seldom take it away. Once you have the color saturation you want, let the flower dry. Glue onto a doily, or add some leaves. You can also use any size flower punch in the same way, but remember you will need to put in a few sheets of filter paper at a time as you will not be able to punch one sheet in a punch. It will not work well. Gee... wonder how I know that! hahah

Oh make a garden full of these... springs a coming! And not to soon for me, as we got more snow today! Jeep'ers will it ever end this year??
Happy Blooming Flowers!