Nature Walk

My swap card for the blog swap. Want to join - send 4 cards to me in a SASE and you will receive 4 different cards back. This swap ends on March 31 - and the challenge is to use pastel colors. Contact me for mailing info.
Recipe: Chalk the background on watercolor paper for texture. Marker on the flower stamp and then stamp on the watercolor paper first and second and a little third generation. Stamp the butterfly and cover with dazzeling details. Stamp greeting in Regal rose ink. Tie on vanilla ribbon and glue to Regal rose card stock. Stamp the envelope too.
ENJOY!

Porch Pillows Before & After

I love before and after pictures in everything, don't you. It is great to see what it was and what it became. It is so inspiring to me. So I have hated these pillow from the day then came home with our back porch furniture. The furniture cushion color is not my favorite too, but the furniture is so comfortable - I do love it, and can live with the color now that I have a after to show you. I brought home a very large blue rug from dads, and a beautiful lace table cloth, and had some blue odds and ends, like a lamp and pot that I really liked. So I thought to myself - "self" how about matching the blue stuff with some fabulous blue fabric and cover those ugly pillows.
Ta-da! What do you think? Aren't these just beautiful? Well you don't really have to agree, but I am super duper happy with the turn out and the color and the patterns and the loveliness of it all!
I have five of the twelve done... yes you read that right twelve. Twelve times the ugly. So when they are all done I will update and share more pictures. I am doing the happy dance over this project. Can ya see me? No? Good! giggle - giggle. Ya maybe one of these days I will cover the cushions too.
ENJOY!

Get Well Good Friend

There is nothing like sending a card and cooking a meal for a friend in need. And there is nothing like digging out a few old stamp sets to stamp the card with. I just love "watercolor gardens" and "dog gone" from days past. Have been a few of my favorites forever. So I stamped dug them out and came up with this cheery card.
ENJOY!

Dryer Balls & Blog Candy Give-A-Way

You can save money on dryer sheets for the next 5 years! Yep that's right.... 5 years. How many loads of laundry do you do in 5 years? Well I would do about 1040 loads of laundry in that time, that's about 4 loads a week. Wow that's depressing huh! So how much would it cost for one dryer sheet for that time? Well heck if I know, cuz I cut my sheets in half and tossed the box and don't remember the cost - so you figure it out and post the cost in a comment below for me - k. Hey what about a Give-A-Way?

Leave a comment below with the following info:
                  Share this link with 5 friends www.debsstamppad.com   List the first names only.                   Get one or more of those 5 friends to become a follower or sign up for auto emails. List
                  first name only on this too.
                        (Please be honest about the lists of who you signed up and shared with)
                  Tell me what it would cost you for 5 years use of dryer sheets.
                   Remember to add your name/email to the comment too, so I can contact you when you win!

When your comment/entry is complete I will enter your name in a drawing for a free set of Dryer Balls. As my sweet Aunt Olga would say, "if its free, its me". So hurry drawing will be on April fools day! Really - no fool'in!


How stink'in cute are these? 
Here is the how too make your own: I found a 100% wool sweater at Goodwill, washed in really really hot water in a pillow case to capture all the fuzz that comes with washing wool in the washing machine. Air dried. Cut the sweater in strips and then rolled the strips super duper tightly in a ball to about the side of a golf ball. Then I get some pretty colored wool roving and wrapped the roving about the wool sweater tight too, till it is about the side of a tennis ball. Then I shoved that baby in an old panty hose leg and tied it up really tight like you would when making sausage.... if ya have ever made sausage. I never have - but this was quite the fun experience. You know it doesn't take much to entertain a stay at home mom/Stampin up Creative Coach these days! So then after all the balls are tied up, you wash the ball rope again in really really (yes I did said it twice again) hot water. You can add them to a load of laundry if ya want to save on a load. Dry in dryer and wash/ dry one more time. Clip/Snip and rip them babies out of the panty hose. You end up with these lovely little balls. Pretty cool huh! Because of the wool they collect and release moisture slowly reducing the static in the dryer, and the bouncing softens the clothes too. And most importantly you have no need for chemical filled dyer sheets for up to 5 years. Yes, yes you add all 3 balls to each load to dry. So they can just live in the dryer. You might want to put a sticky note on the dryer front with the date you put them in, and count 5 years forward so you know when you will need to replace them.

Don't want to make them: You can purchase a set of 3 from me for $7 ($3 shipping). That is about the cost of 2 boxes of the good dryer sheets.  Order here

Shadow Box for Project Club in April

 RSVP quick so you will have a seat saved to make this adorable Shadow Box. Bring a couple of pictures with you, and let me know what colors you would like to use to that will go with your pictures. You can copy the pictures or just print on paper if you don't want to use your orginals.
Project club is Thursday April 12 at 6pm. Cost $10, or free with $25 Stampin Up order (before s/h & tax). Hope you can make it. RSVP here.

Ruffled T-Shirt Dress

 My granddaughter will look so cute in this T-Shirt Dress. I took 2 strips of fabric two and half times the width of the t-shirt bottom, one 4" wide and one 6" wide. I sewed the lengths together to make a ring, hemmed one edge,  and layered them together at the unfinished edge and ran a gathering stitch along the top edge. Gathered it up and sewed it to the inside of the t-shirt edge. Iron it so it would lay nicely. Tied a little red bow and hand sewed to center top of neckline.
 For the little hand bag, I cut 4 - 5"x 7" fabric pieces. 2- 5" x7" pieces of heavy interfacing, to give the hand bag a little body. Iron in the interfacing, Sew in the zipper. Add the strap. Cut strap to choice of length and width. With right sides together and strap hidden between the right sides, OPEN ZIPPER (very important step) Sew the 2 sides and bottom, then zig zag raw edges. Turn, press and you have little hand bag! Hand sew on the bow.
ENJOY!

Sewing with Stampin Up Fabric


Such a cute "On the Go" purse in the cutest fabric ever. This is fall fabric was released last year and is still available from Stampin Up. We have the prettiest fabrics ever. Check them out at here. Love this Spice Cake fabric and love Spice Cake too! Ha. I have a few of these little purses for sale.


Blue Rose "On the Go" purse (above) One (1) available.  $23.00 Size is about 10x8". Zipper closer with wrist band. 100% cotton, can be washed in cold water on gentle cycle. Ironing may be needed.
Red rose shown below (sold)


Teal/Brown set is a gift, but special orders can be place. A key fob ($4) using the same fabrics, a note pad cover ($4) and fabric filled pen ($2) are also available for order.


 Hope you are inspired to use some scraps, or better yet order some of the Stampin Up amazing fabric and get crafting.
ENJOY!

Feb Card Swap Part 6

 Card by me
This stamp set is a hostess set from the mini catalog for just $10 wood  and $8 clear. You can get it with a $150 workshop till the end of April. Book a workshop today and don't miss this adorable
 "Up in the Air" hostess stamp set.
 

Card by Judy Hacker

Feb Card Swap Part 1

Card Club Swaps for the month of Feb.

 This wedding card is done by Susan Crabb.

I have always loved these boots.
Card by Janice Rowe.

ATC Swaps are In for February

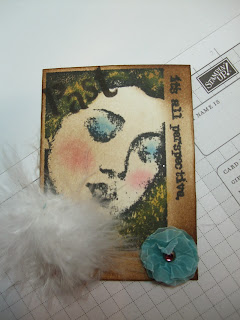
Here is a follow up post to the ATC Swap. I wanted to share the Swaps that were sent in. All are just beautiful - and unique to the Artist. Thank you all for entering.

by Judi Birt

By Janice Rowe

By Pam Wright

By Debbie Buchanan

By Donna Harcourt

By Janice Rowe (Janice's were all different)

By Janice Rowe (sorry about the glare on this one)
 So many have asked what is a ATC and how do you make one? Well it is a little bitty tiny piece of art. About 2 1/2" x 3 1/2" piece of card board or card stock or paint chips or formica sample or wood or what ever kind of base you want to use.  Its you favorite colors of ink, paint, chalk, crayon, or pencil, or dyes. It's a bit of this and that, a little do dad of treasures or junk. Bits of ribbon, fibers, yarn or moss. It is a personal expression of what you love, how you fell, or like to look at or work with. It can be anything and everything all wrapped up on one little bit of flat surface that we call Art. That's the beauty of it. It is all you, your way! No teacher can grade you, because it is about who you are and what you like. So it and you are perfect in every way as God made you to be.

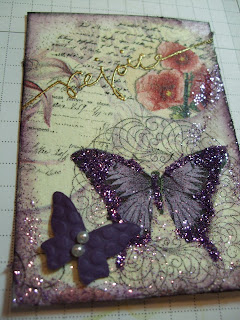
So let me share a little bit about my art, to help you understand a little more. Here is my before with a past stamp from Stampin Up embossed with black embossing powder on water color paper. I love this stamp set. I love watercolor paper. So that is a great place to start.

 And here is my after: Water colored butterfly with inks and blender pens (my personal favorite way to color), then sponged celery and olive ink on edges (cuz I like the way the light and dark inks on the edges give depth to the card), then I rubbed a bit of saffron ink to highlight the white area (cuz life should be colorful), then glittered it all up, ( I really really really love love love glitter in every shade they come in). Then I used some big sparkly bits of stuff I have had sitting in a drawer for a long time, (trash to one is treasure to another) and then a bit of a sparkle flower. (Why yes more glitter). And you have it -one finished ATC card to give, to attach as a tag to a bag, to glue onto a card front, to use as a book marker, to add a magnet on the back and put it on the fridge for all to see.
Most importantly to share with the world, so the world can be stamp happy too. So this post is a bit of off in la-la-land today - For all those who love to really get deep and for those who just want to laugh at it! Hope you enjoyed the mushy gushy of it all. I will be hosting more ATC swaps in the near future - hope you will join in.

 So are you inspired? I sure am. Want to join in on the March Card Swap? Make 4 cards using pastel colors. Baby pinks, blues, greens, yellow, lavender and white only. Be sure to include the envelope with each card. I don't like getting odd sized cards without envelops - do you? The card can be any size, but must be a full card, not a post card type.  Be sure to sign the back of the card, so everyone knows who the artist is. Send to me at 8729 S Co Rd 250 W, Cloverdale IN 46120 by March 30th. Send a SASE so your cards can be returned to you. You don't need to sign up, just send in your cards. You will get 4 different cards back after March 30th. Any questions - leave a comment or email me.

Mouthwatering Cherries

Have you seen this stamp set yet? Oh my goodness it is a great one for the upcoming summer season. Ya got to get one before they are all picked! Cherries, Melons, and Ice creams - perfect for kid celebrations, men who love sweets and more. Big bold design that makes it quick and easy to stamp with. Love love love this fun set.
Fun page titles and card saying: You are one in a Melon! Please with a Cherry on Top!
 I scream for Ice Cream!  Happy Popsicle day Pop!
Mouthwatering Stamp Set    #125675 wood $20.95      #125677 clear $16.95
Help support this blog by ordering Stampin Up products from me.
Thanks and hope to see you stamping soon.

Notes on a Ring

Aren't these just the cutest? These are my hostess gifts for March. Oh and have you checked out the Event Calendar for March at the page link above? Got to check it out and join in the fun. Ok - book a workshop for March or be the hostess for a club and you will get this little gift as a extra thank you from me. Cuteness huh. The post-it notes are cut with the wonderful dies that Stampin Up carries, punched the hole with the Crop-A-Dile and added a cover and backing. Looped on a key ring, tie on ribbon and wa-la, cute little gift.