Valentines Love Book

I signed up to participate in a Valentines Secret Sister Swap, and this is what I came up with. You will laugh when I share what I used to make it.... a paper towel roll! Yep we had emptied a roll and I thought that I could do something with it. I had seen them made with toilet paper rolls, but wanted something a little larger, so here is the outcome. I smooshed the roll in my big shot and then cut it in half and wrapped designer series paper around it. I used scraps and bits and pieces from my stash to create it.
 The pages are filled with bible verses and quotes from Mother Teresa.


I packaged it too in a cello bag with a topper. 
I am really excited about how it turned out, I cannot wait to send it to my secret sister.

Winter Art Journal Class

We had such a great time in class. The above shot is my original that I taught from. The below shots are my amazing students with their finished pages.
 From left to right is Janice R., Nikki T, and Crista M. and below is Georgeanne C, (and not pictured Sharon M. who's master piece was not finished yet) all  my dear sweet friends. It is always so much fun to share an evening with them. Life is better when you share art with friends.

We used Stampin Up ink refills and aqua painters for the sky and snow. They cut out old Christmas Cards for the elements on the page. We used Stampin Up c'ordinations card stock for the tree and ran that threw the wood grain embossing folder. Then after everything was glued in place we used dazzling diamond glitter, mica flakes and liquid applique' for the snow. Mark your calendars and plan to attend the next class on Feb 14 at 6pm at The Stamp Pad. Page will be filled with Butterflies.

Mexican tonight?

This recipe scrapbook page was shared at recipe club this month. Easiest ever one dish chicken tamales and queso verde - yummy! I used punches to create the hat and maracas. Then cut strips from the new designer series paper stack to create design. Uber cute, uber easy and uber yummy!
Remember you can click on the purple underlined item and go right to the page to shop. 
Fresh Prints Designer Series Paper Stack
Fresh Prints Designer Series Paper Stack 132996
Price: $6.95
Create multiple cards in a snap with this stack of Designer Series Paper. Sized large enough for card fronts.

Coordinating colors: Coastal Cabana, Crumb Cake, Real Red, Whisper White.

■ 48 sheets: 4 ea. of 12 double-sided designs
■ 4-1/2" x 6-1/2"
■ Acid free, lignin free

Love to Scrapbook Page


I think this is such a fun idea for a scrap book page and really easy to do. You just need to take your time and do a little prep work for the mask. So keep ready and I will show you how to do this. 
Starting with the same size scrap card stock r or card board that your scrap page or card is you will make a circle. I used a lid from Stampin Up's embellishment containers. You can place your circle anywhere on the page you like, but remember that will be where the center of the star burst design will be. Then using a ruler, draw lines straight through the center of the circle.... or close to the center anyway. Be sure you have an even amount of sections. Then what I did to help me not cut out the wrong section, I made a "x" in every other section and only cut out those with the "x".
This is what you should end up with then every other section is cut out.
Then lay your starburst mask over your scrapbook paper or card and mist any kind of paint, sparkle spray you want. You can also sponge along the cut lines. I used Stampin Up's glitter mist. Let whatever you use a chance to dry, as to not smear it when removing the mask.
And this is what you end up with when you are finished. Awesome right!
 Here is a few close ups of what I added in the center of the star burst. But you could also use pictures and embellish a bit around the picture.
Where did you get the "love" from? This is from a lovely die set from Stampin Up (not available any longer). I cut it out using the word "love" and out amazing foil paper. Looks hard? Not at all when you know the secret. When using the detailed dies like this if you layer a double sheet of wax paper between your die and paper the design will release from the die every easily.
 Here is a shot of how I gathered up the doily. Cut the doily in half and then just pinch a bit across the fold line and crease to hold the gathers. Tuck the cut edge under elements to hid it.


Silver Foil Sheets
Silver Foil Sheets 132178
Price: $3.95
The price of silver keeps going up, and the value of your projects will go up too when you use these beautiful foil sheets! 2 single-sided sheets. 12" x 12". Can be cut with punches or Big Shot dies. Acid free.
Tea Lace Paper Doilies
Tea Lace Paper Doilies 129399
Price: $2.95
Delicate and dainty. Stamp ‘em, color ‘em with ink, or use ‘em as accents. 32 doilies: ea. 4" diam. White.


You Make Me Happy

I used the same masking star burst technique to create this card and one of the Sale-a-Bration sets. Oh Ya! It is that happy time of the year again. Sale-a-Bration begins TODAY! Spend $50 and get a free gift of your choice from the Sale-a-Bration flyer. Happy! Happy! Happy! Now that ot' to cheer your winter blues.  Sale-a-Bration has ended.

Before and After All Done

 Remember the post where I shared this and it was almost done... where her it is completed. I love it!

Beautiful Butterfly Pop

 Outside of card is made on shimmer paper - ooohh!
Blam-o inside of card is made out of pure beautiful ohhhh and ahhhhhh! This is a swap I received from one of my down-line gals. She didn't put her name on the back and I cannot for the life of me remember who sent it, and its only been a week. Frozen brain from all the snow we have been getting oh and not to mention the below 0 temps.  Ya I am sticking with frozen brain syndrome!
But isn't this card just absolutely amazingly beautiful.... I so want to make one too. Might even share it at card club one of these days!

Jamberry Nail.

Remember I told you I had signed up to be a Jamberry Nail Consultant? Well I need/want/ just gotta to share some fun stuff with ya.

First off; when you purchase 3 nail wraps for $15 each, you can get your choice of a fourth one for free. You can order from my web site here: www.debb.jamberrynails.com.

Second off; there are videos on how to apply nail wraps! Mix and match... do your toes too!

Third off;  there are over 300 designs to choose from and much more. The little nail heater is adorable! Get the nail application kit with the oil - oh it is super nice and a great bargain under $20.

Forth off; The product is great! After using them for a few weeks now. I would have to say they are beautiful, durable, and affordable!

Come on, click over to my web site and see what all the fun is about. www.debb.jamberrynails.com.

Would you like to host a nail party with your friends and family? Look at all the goods you can get! Click the link for a larger view of the Jan flyer.
 
https://workstation.jamberrynails.net/uploads/cms/docs/Jamuary%20Party%20Flier.pdf


Hang a Calandar and Note Pad

 Would you like to make one of these adorable Calendar and Note Pad hangers? I know that some of my card club gals have already, because I shared this with them in December.... but now I am gonna share it with you. The top one in purple with the butterfly is for one of my gals in my Stampin Up down-line who just earned a huge promotion. Go Dawn!
 Ok so this is what you will need. Three die cuts using the top note die out of  DSP (Designer Series Paper) I used Eastern Elegance and three from a solid card stock for strength. You will need nine brads to match papers and two top not die cuts of clear transparency. Cut the transparency in half on the long side, so you end up with four 1/2 top note pieces.
Eastern Elegance Designer Series Paper
Eastern Elegance Designer Series Paper 130131
Price: $10.95
Top Note Stampin' Up! Bigz Die
Top Note Stampin' Up! Bigz Die 113463
Price: $21.95

Glue the solid card stock to the back side of the printed. Sandwich one clear transparency on one side with the printed paper and one on the solid side. Punch a small hole to fit the brad at three points. The brads will hold the transparency's in place to make a little pocket. You will want a pocket on the front printed side of all three sections, and you will have one extra pocket to add to the back of the section you will place at the top of the hanger. Do this for all three die cut pieces.


 Now use a larger punch to fit ribbon and punch holes in the rounded corner. Lay your top note pieces in order like you would like it to hang. Punch all four corners of the top two pieces, and then just in the top of the bottom section. Tie the ribbon in a knot connecting the sections.  Notice in the lower shot the length of ribbon I cut and connected to use as the hanger. You could also make jump rings and connect the sections with rings. Ribbon was easier.
Embellish as you would like. I made a clay flower and pop dot it over a punch little paper doily, for one section. And then I layered and pop doted the "year" on the seconded section.


I printed the little calendar on card stock at http://www.calendarlabs.com

Cut the calendar sections apart as evenly as you can and stack them up and slip all of them in the middle section pocket. I printed another calendar with just lines to write birthdays and anniversary on, OR you can use a favorite picture in the top section.

The pocket on the back side of the top section can be used to hold the extra calendar or special day sections or you could stamp the seasons and display one at a time in the front pocket.

When adding the post it note, slip about 1/2 of the post it note paper in to the pocket. It can be a little heavy so putting extra of the paper in the pocket helps it to stay in place. You can also remove the last page of the note pad and stick the paper to the section to help it stay in place as well.


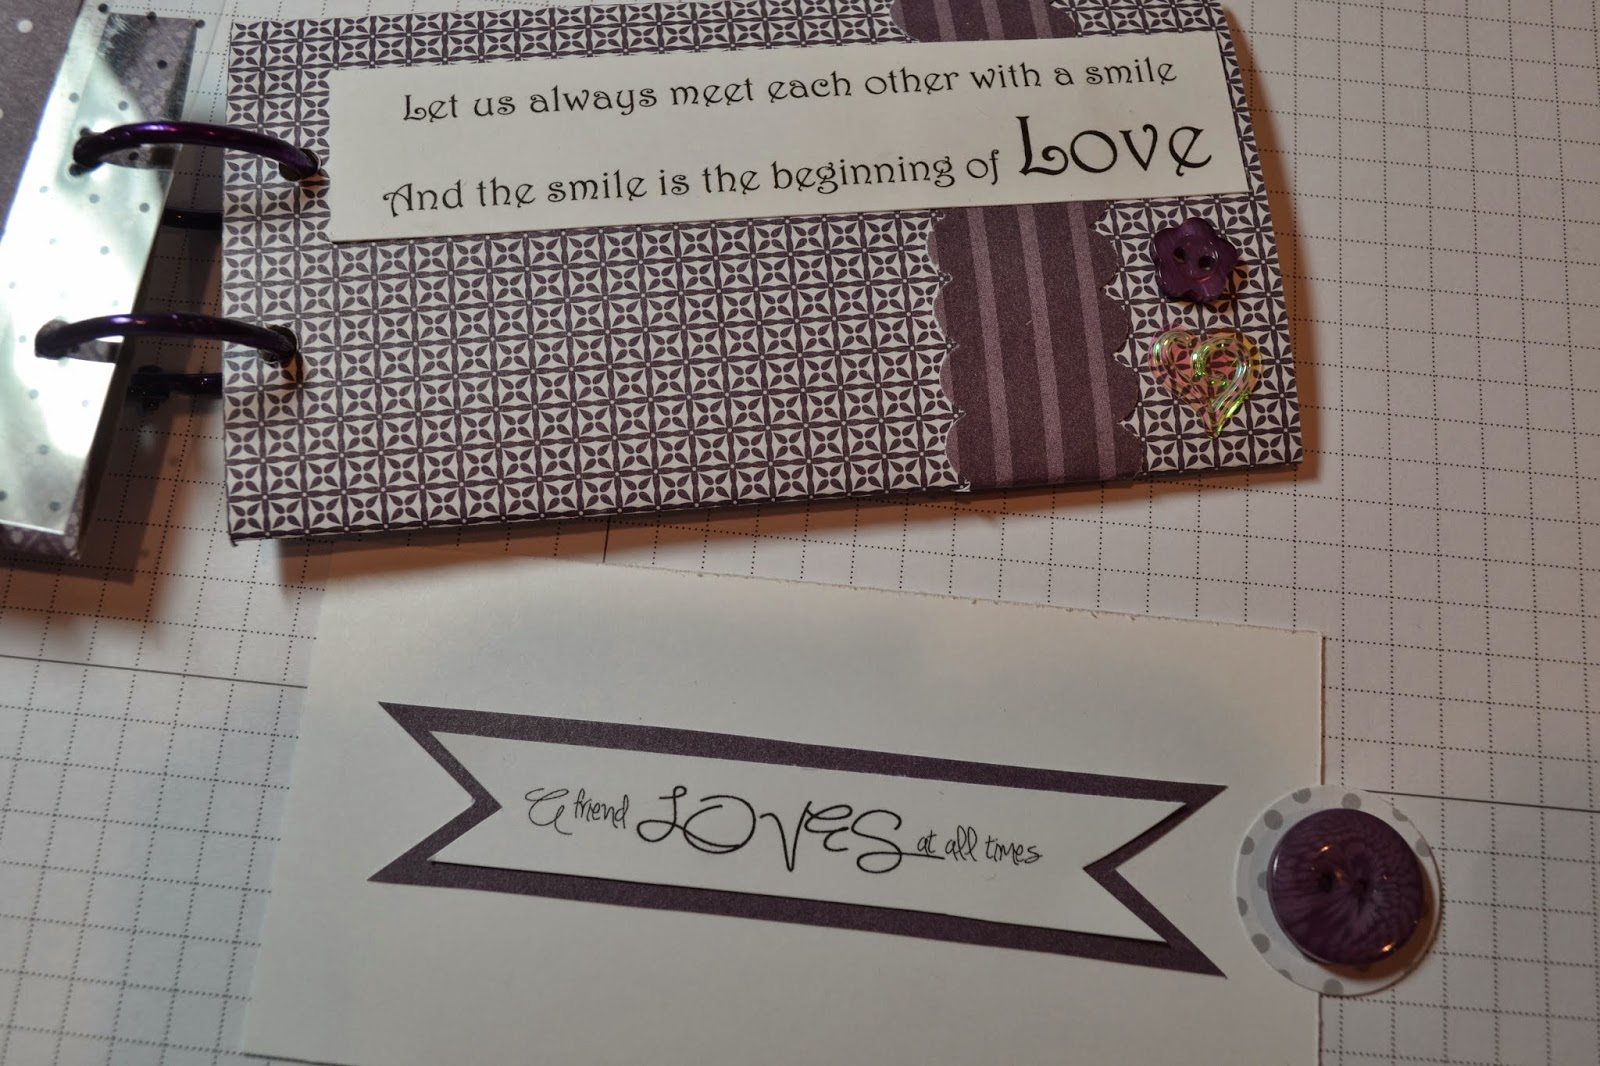
 I wanted to show you a close up of the added butterfly to this personalized gift for Dawn. All I did was add an extra embellishment . The butterfly was a food pick from the dollar store, I removed the pic and added holes to tie it on. She loves purple and glitter oh and pickles... to bad I didn't fine a glitter purple pickle pick!

Hope you try this fun project soon.

Millefiori

What is millefiori? Sounds like an Italian love song to me. It means millions of flowers-cover in bloom. Well it is a love song to me! I love millions of flowers and Italian food! How stink'in perfect is that. 

Millefiori is the theme for this ATC swap. All I did was use the basic 3 1/2" x 2 1/2" ATC base and cut out some leaves, glued over the ATC base then cut off the base so the leaves would be the shape. Then I cut the larger flowers in half and glued and layer til I have millions of flowers. The paper curls was using that same wave trimmer I've been bragging on the past few days and cut really thin strips of paper, I wrapped them around a orange stick and then glued them in place. Spring is really coming along with a welcomed warm up!

Wine and Roses

On this ATC I was to paint AGAIN! But I love the way this one turned out. I used some mica watercolor paint that is where all the sparkly comes from. The theme wine and roses. Well there was no way I was painting a wine bottle or glass... so I chose to shave a bit of a cork and call that the wine part of the theme. I hand drew the rose and then painted it in, layering a few of the water colors. A snip it of ribbon and a bobble from left over prom dress trim. I am loving this one... hope you do to.

Fall Glitters

Fall.... we are still in freezing Winter! Well I like working ahead and this made me fill warm when all the outside is so cold. So I hope it warms you up a bit too.

Are you tired of all the ATC shares? Well I have this one and just one more to share. The theme was fall glitters... I found it to be an odd theme, but so fun to do once I got started. Who said fall can't glitter and shine? I used water color pencils for the painting of the tree, grass, pumpkin and sky. Then I used the mica watercolors for the "leaves" and tapped a bit on the ground as if some were falling. the triangles and dots are my artistic push for leaves....3-D leaves! Ha Ha, the truth of the matter is there were left overs from die punches from other projects I just couldn't toss, so hey... glitter leaves they become and perfect for the glittery fall!

Just Make Art

The challenge of this one was to make a whimsey girl... well this one is whimsey alright! Here head is to big for her face and she looks like me... with a double/triple chin! She looks a bit cross eyed and her lips are crooked... ha. Good thing God is a better artist them me, we'd all be looking a little like her! Ha I crack myself up some days..... After pencil drawing her, I water-colored using my inktense pencils. LOVE them! I really like the fun design even if she is a cross eyed crooked lip fat head. Giggle giggle!

Time for Tea

Hummmm hot tea to warm you up! Here is another ATC swap. I needed to paint a tea pot this time. So I water-colored this tea pot drawing in using real dollar store watercolors! The paint really kinda sucked, but what do you expect with buying cheep art supplies. But I wanted something I could play around with that wasn't very much money, and so I do love the ATC... the paint was just yaaaa! I love my design and the sparkly steam. Oh and check out that edge.. yep it is that great wave rotary trimmer again! have I got you talked in to buying one yet?

Zantangle A Snowman

Over the next few days I am going to share some ATC's swaps I have made for a group swap. Most are quite a challenge for me as they are to be painted. I can use paint or watercolor pencils. the pencil part I am happy about... it is the paint part that trips me up. As I do not spend as much time with paint as I would like to... to busy stamping with ink and stamps!
This is my zantangle snowman girl. Have you ever tried zantangle? Well it is so fun and easy and relaxing. All you need is paper and a pen/marker.... and just doodle away. It is easy, just make a scribble and fill in the scribble with little dots, dashes, swirls, curls... what ever strikes your fancy. It Is fun to see what designs you come up with. This is a great craft to take on the road too.

Snowed In


Snowed in and almost loving it! Almost was until the power went out and stayed out for 28 hours.
Here is the Buchanan official measurement! Good heavens that is a lot of snow! The most snow we have seen at one time in a long time.
 The joy came by watching these critters out the new back room. It was like sitting "outside" in the middle of a white winter wonderland. We were surrounded by beauty, white every where, birds ever where, the entertainment lasted till dark.

 It was the best TV program we ever watched!


There were 30-40 birds eating the seed we put out all day for the past forever snow days! I need to get some more seed! My dad spends most of his day watching the birds.

I painted this one! Ha it sure looks like it has been painted. Praise to God for His beauty and the talent He shares with us.